GET 65% Discount on All Products
Coupon code: "bigdisc65"
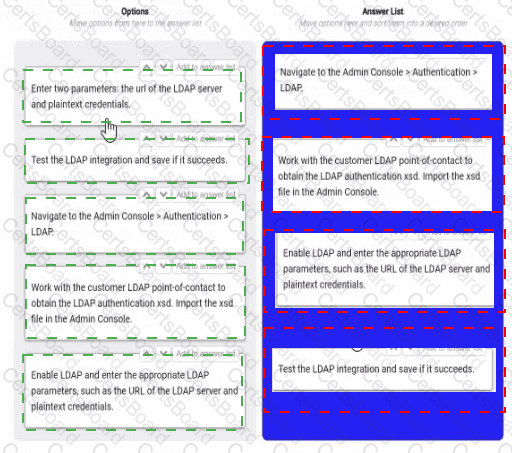
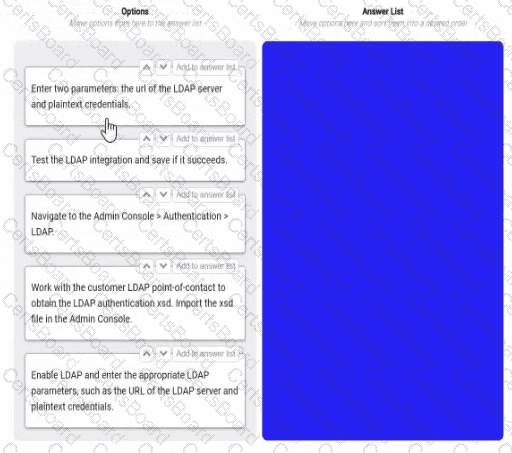
You are selling up a new cloud environment. The customer already has a system of record for Its employees and doesn't want to re-create them in Appian. so you are going to Implement LDAP authentication.
What are the next steps to configure LDAP authentication?
To answer, move the appropriate steps from the Option list to the Answer List area, and arrange them in the correct order. You may or may not use all the steps.
Navigate to the Admin console > Authentication > LDAP. This is the first step, as it allows you to access the settings and options for LDAP authentication in Appian.
Work with the customer LDAP point of contact to obtain the LDAP authentication xsd. Import the xsd file in the Admin console. This is the second step, as it allows you to define the schema and structure of the LDAP data that will be used for authentication in Appian. You will need to work with the customer LDAP point of contact to obtain the xsd file that matches their LDAP server configuration and data model. You will then need to import the xsd file in the Admin console using the Import Schema button.
Enable LDAP and enter the LDAP parameters, such as the URL of the LDAP server and plaintext credentials. This is the third step, as it allows you to enable and configure the LDAP authentication in Appian. You will need to check the Enable LDAP checkbox and enter the required parameters, such as the URL of the LDAP server, the plaintext credentials for connecting to the LDAP server, and the base DN for searching for users in the LDAP server.
Test the LDAP integration and see if it succeeds. This is the fourth and final step, as it allows you to verify and validate that the LDAP authentication is working properly in Appian. You will need to use the Test Connection button to test if Appian can connect to the LDAP server successfully. You will also need to use the Test User Lookup button to test if Appian can find and authenticate a user from the LDAP server using their username and password.
Configuring LDAP authentication in Appian Cloud allows the platform to leverage an existing employee system of record (e.g., Active Directory) for user authentication, avoiding manual user creation. The process involves a series of steps within the Appian Administration Console, guided by Appian’s Security and Authentication documentation. The steps must be executed in a logical order to ensure proper setup and validation.
Navigate to the Admin Console > Authentication > LDAP:The first step is to access the LDAP configuration section in the Appian Administration Console. This is the entry point for enabling and configuring LDAP authentication, where administrators can define the integration settings. Appian requires this initial navigation to begin the setup process.
Work with the customer LDAP point-of-contact to obtain the LDAP authentication xsd. Import the xsd file in the Admin Console:The next step involves gathering the LDAP schema definition (xsd file) from the customer’s LDAP system (e.g., via their point-of-contact). This file defines the structure of the LDAP directory (e.g., user attributes). Importing it into the Admin Console allows Appian to map these attributes to its user model, a critical step before enabling authentication, as outlined in Appian’s LDAP Integration Guide.
Enable LDAP and enter the appropriate LDAP parameters, such as the URL of the LDAP server and plaintext credentials:After importing the schema, enable LDAP and configure the connection details. This includes specifying the LDAP server URL (e.g., ldap://ldap.example.com) and plaintext credentials (or a secure alternative like LDAPS with certificates). These parameters establish the connection to the customer’s LDAP system, a prerequisite for testing, as per Appian’s security best practices.
Test the LDAP integration and save if it succeeds:The final step is to test the configuration to ensure Appian can authenticate against the LDAP server. The Admin Console provides a test option to verify connectivity and user synchronization. If successful, saving the configuration applies the settings, completing the setup. Appian recommends this validation step to avoid misconfigurations, aligning with the iterative testing approach in the documentation.
Unused Option:
Enter two parameters: the URL of the LDAP server and plaintext credentials:This step is redundant and not used. The equivalent action is covered under "Enable LDAP and enter the appropriate LDAP parameters," which is more comprehensive and includes enabling the feature. Including both would be duplicative, and Appian’s interface consolidates parameter entry with enabling.
Ordering Rationale:
The sequence follows a logical workflow: navigation to the configuration area, schema import for structure, parameter setup for connectivity, and testing/saving for validation. This aligns with Appian’s step-by-step LDAP setup process, ensuring each step builds on the previous one without requiring backtracking.
The unused option reflects the question’s allowance for not using all steps, indicating flexibility in the process.
You need to generate a PDF document with specific formatting. Which approach would you recommend?
Create an embedded interface with the necessary content and ask the user to use the browser "Print" functionality to save it as a PDF.
Use the PDF from XSL-FO Transformation smart service to generate the content with the specific format.
Use the Word Doc from Template smart service in a process model to add the specific format.
There is no way to fulfill the requirement using Appian. Suggest sending the content as a plain email instead.
Comprehensive and Detailed In-Depth Explanation:
As an Appian Lead Developer, generating a PDF with specific formatting is a common requirement, and Appian provides several tools to achieve this. The question emphasizes "specific formatting," which implies precise control over layout, styling, and content structure. Let’s evaluate each option based on Appian’s official documentation and capabilities:
A. Create an embedded interface with the necessary content and ask the user to use the browser "Print" functionality to save it as a PDF:This approach involves designing an interface (e.g., using SAIL components) and relying on the browser’s native print-to-PDF feature. While this is feasible for simple content, it lacks precision for "specific formatting." Browser rendering varies across devices and browsers, and print styles (e.g., CSS) are limited in Appian’s control. Appian Lead Developer best practices discourage relying on client-side functionality for critical document generation due to inconsistency and lack of automation. This is not a recommended solution for a production-grade requirement.
B. Use the PDF from XSL-FO Transformation smart service to generate the content with the specific format:This is the correct choice. The "PDF from XSL-FO Transformation" smart service (available in Appian’s process modeling toolkit) allows developers to generate PDFs programmatically with precise formatting using XSL-FO (Extensible Stylesheet Language Formatting Objects). XSL-FO provides fine-grained control over layout, fonts, margins, and styling—ideal for "specific formatting" requirements. In a process model, you can pass XML data and an XSL-FO stylesheet to this smart service, producing a downloadable PDF. Appian’s documentation highlights this as the preferred method for complex PDF generation, making it a robust, scalable, and Appian-native solution.
C. Use the Word Doc from Template smart service in a process model to add the specific format:This option uses the "Word Doc from Template" smart service to generate a Microsoft Word document from a template (e.g., a .docx file with placeholders). While it supports formatting defined in the template and can be converted to PDF post-generation (e.g., via a manual step or external tool), it’s not a direct PDF solution. Appian doesn’t natively convert Word to PDF within the platform, requiring additional steps outside the process model. For "specific formatting" in a PDF, this is less efficient and less precise than the XSL-FO approach, as Word templates are better suited for editable documents rather than final PDFs.
D. There is no way to fulfill the requirement using Appian. Suggest sending the content as a plain email instead:This is incorrect. Appian provides multiple tools for document generation, including PDFs, as evidenced by options B and C. Suggesting a plain email fails to meet the requirement of generating a formatted PDF and contradicts Appian’s capabilities. Appian Lead Developer training emphasizes leveraging platform features to meet business needs, ruling out this option entirely.
Conclusion: The PDF from XSL-FO Transformation smart service (B) is the recommended approach. It provides direct PDF generation with specific formatting control within Appian’s process model, aligning with best practices for document automation and precision. This method is scalable, repeatable, and fully supported by Appian’s architecture.
You are developing a case management application to manage support cases for a large set of sites. One of the tabs in this application s site Is a record grid of cases, along with Information about the site corresponding to that case. Users must be able to filter cases by priority level and status.
You decide to create a view as the source of your entity-backed record, which joins the separate case/site tables (as depicted in the following Image).
Which three column should be indexed?
site_id
status
name
modified_date
priority
case_id
Indexing columns can improve the performance of queries that use those columns in filters, joins, or order by clauses. In this case, the columns that should be indexed are site_id, status, and priority, because they are used for filtering or joining the tables. Site_id is used to join the case and site tables, so indexing it will speed up the join operation. Status and priority are used to filter the cases by the user’s input, so indexing them will reduce the number of rows that need to be scanned. Name, modified_date, and case_id do not need to be indexed, because they are not used for filtering or joining. Name and modified_date are only used for displaying information in the record grid, and case_id is only used as a unique identifier for each record. Verified References: Appian Records Tutorial, Appian Best Practices
As an Appian Lead Developer, optimizing a database view for an entity-backed record grid requires indexing columns frequently used in queries, particularly for filtering and joining. The scenario involves a record grid displaying cases with site information, filtered by “priority level” and “status,” and joined via the site_id foreign key. The image shows two tables (site and case) with a relationship via site_id. Let’s evaluate each column based on Appian’s performance best practices and query patterns:
A. site_id:This is a primary key in the site table and a foreign key in the case table, used for joining the tables in the view. Indexing site_id in the case table (and ensuring it’s indexed in site as a PK) optimizes JOIN operations, reducing query execution time for the record grid. Appian’s documentation recommends indexing foreign keys in large datasets to improve query performance, especially for entity-backed records. This is critical for the join and must be included.
B. status:Users filter cases by “status” (a varchar column in the case table). Indexing status speeds up filtering queries (e.g., WHERE status = 'Open') in the record grid, particularly with large datasets. Appian emphasizes indexing columns used in WHERE clauses or filters to enhance performance, making this a key column for optimization. Since status is a common filter, it’s essential.
C. name:This is a varchar column in the site table, likely used for display (e.g., site name in the grid). However, the scenario doesn’t mention filtering or sorting by name, and it’s not part of the join or required filters. Indexing name could improve searches if used, but it’s not a priority given the focus on priority and status filters. Appian advises indexing only frequently queried or filtered columns to avoid unnecessary overhead, so this isn’t necessary here.
D. modified_date:This is a date column in the case table, tracking when cases were last updated. While useful for sorting or historical queries, the scenario doesn’t specify filtering or sorting by modified_date in the record grid. Indexing it could help if used, but it’s not critical for the current requirements. Appian’s performance guidelines prioritize indexing columns in active filters, making this lower priority than site_id, status, and priority.
E. priority:Users filter cases by “priority level” (a varchar column in the case table). Indexing priority optimizes filtering queries (e.g., WHERE priority = 'High') in the record grid, similar to status. Appian’s documentation highlights indexing columns used in WHERE clauses for entity-backed records, especially with large datasets. Since priority is a specified filter, it’s essential to include.
F. case_id:This is the primary key in the case table, already indexed by default (as PKs are automatically indexed in most databases). Indexing it again is redundant and unnecessary, as Appian’s Data Store configuration relies on PKs for unique identification but doesn’t require additional indexing for performance in this context. The focus is on join and filter columns, not the PK itself.
Conclusion: The three columns to index are A (site_id), B (status), and E (priority). These optimize the JOIN (site_id) and filter performance (status, priority) for the record grid, aligning with Appian’s recommendations for entity-backed records and large datasets. Indexing these columns ensures efficient querying for user filters, critical for the application’s performance.
What are two advantages of having High Availability (HA) for Appian Cloud applications?
An Appian Cloud HA instance is composed of multiple active nodes running in different availability zones in different regions.
Data and transactions are continuously replicated across the active nodes to achieve redundancy and avoid single points of failure.
A typical Appian Cloud HA instance is composed of two active nodes.
In the event of a system failure, your Appian instance will be restored and available to your users in less than 15 minutes, having lost no more than the last 1 minute worth of data.
Comprehensive and Detailed In-Depth Explanation:
High Availability (HA) in Appian Cloud is designed to ensure that applications remain operational and data integrity is maintained even in the face of hardware failures, network issues, or other disruptions. Appian’s Cloud Architecture and HA documentation outline the benefits, focusing on redundancy, minimal downtime, and data protection. The question asks for two advantages, and the options must align with these core principles.
Option B (Data and transactions are continuously replicated across the active nodes to achieve redundancy and avoid single points of failure):This is a key advantage of HA. Appian Cloud HA instances use multiple active nodes to replicate data and transactions in real-time across the cluster. This redundancy ensures that if one node fails, others can take over without data loss, eliminating single points of failure. This is a fundamental feature of Appian’s HA setup, leveraging distributed architecture to enhance reliability, as detailed in the Appian Cloud High Availability Guide.
Option D (In the event of a system failure, your Appian instance will be restored and available to your users in less than 15 minutes, having lost no more than the last 1 minute worth of data):This is another significant advantage. Appian Cloud HA is engineered to provide rapid recovery and minimal data loss. The Service Level Agreement (SLA) and HA documentation specify that in the case of a failure, the system failover is designed to complete within a short timeframe (typically under 15 minutes), with data loss limited to the last minute due to synchronous replication. This ensures business continuity and meets stringent uptime and data integrity requirements.
Option A (An Appian Cloud HA instance is composed of multiple active nodes running in different availability zones in different regions):This is a description of the HA architecture rather than an advantage. While running nodes across different availability zones and regions enhances fault tolerance, the benefit is the resulting redundancy and availability, which are captured in Options B and D. This option is more about implementation than a direct user or operational advantage.
Option C (A typical Appian Cloud HA instance is composed of two active nodes):This is a factual statement about the architecture but not an advantage. The number of nodes (typically two or more, depending on configuration) is a design detail, not a benefit. The advantage lies in what this setup enables (e.g., redundancy and quick recovery), as covered by B and D.
The two advantages—continuous replication for redundancy (B) and fast recovery with minimal data loss (D)—reflect the primary value propositions of Appian Cloud HA, ensuring both operational resilience and data integrity for users.
You are the project lead for an Appian project with a supportive product owner and complex business requirements involving a customer management system. Each week, you notice the product owner becoming more irritated and not devoting as much time to the project, resulting in tickets becoming delayed due to a lack of involvement. Which two types of meetings should you schedule to address this issue?
An additional daily stand-up meeting to ensure you have more of the product owner’s time.
A risk management meeting with your program manager to escalate the delayed tickets.
A sprint retrospective with the product owner and development team to discuss team performance.
A meeting with the sponsor to discuss the product owner’s performance and request a replacement.
Comprehensive and Detailed In-Depth Explanation:
As an Appian Lead Developer, managing stakeholder engagement and ensuring smooth project progress are critical responsibilities. The scenario describes a product owner whose decreasing involvement is causing delays, which requires a proactive and collaborative approach rather than an immediate escalation to replacement. Let’s analyze each option:
A. An additional daily stand-up meeting: While daily stand-ups are a core Agile practice to align the team, adding another one specifically to secure the product owner’s time is inefficient. Appian’s Agile methodology (aligned with Scrum) emphasizes that stand-ups are for the development team to coordinate, not to force stakeholder availability. The product owner’s irritation might increase with additional meetings, making this less effective.
B. A risk management meeting with your program manager: This is a correct choice. Appian Lead Developer documentation highlights the importance of risk management in complex projects (e.g., customer management systems). Delays due to lack of product owner involvement constitute a project risk. Escalating this to the program manager ensures visibility and allows for strategic mitigation, such as resource reallocation or additional support, without directly confronting the product owner in a way that could damage the relationship. This aligns with Appian’s project governance best practices.
C. A sprint retrospective with the product owner and development team: This is also a correct choice. The sprint retrospective, as per Appian’s Agile guidelines, is a key ceremony to reflect on what’s working and what isn’t. Including the product owner fosters collaboration and provides a safe space to address their reduced involvement and its impact on ticket delays. It encourages team accountability and aligns with Appian’s focus on continuous improvement in Agile development.
D. A meeting with the sponsor to discuss the product owner’s performance and request a replacement: This is premature and not recommended as a first step. Appian’s Lead Developer training emphasizes maintaining strong stakeholder relationships and resolving issues collaboratively before escalating to drastic measures like replacement. This option risks alienating the product owner and disrupting the project further, which contradicts Appian’s stakeholder management principles.
Conclusion: The best approach combines B (risk management meeting) to address the immediate risk of delays with a higher-level escalation and C (sprint retrospective) to collaboratively resolve the product owner’s engagement issues. These align with Appian’s Agile and leadership strategies for Lead Developers.
You are on a protect with an application that has been deployed to Production and is live with users. The client wishes to increase the number of active users.
You need to conduct load testing to ensure Production can handle the increased usage
Review the specs for four environments in the following image.
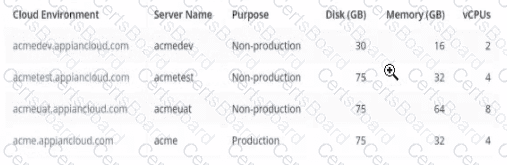
Which environment should you use for load testing7
acmeuat
acmedev
acme
acmetest
The image provides the specifications for four environments in the Appian Cloud:
acmedev.appiancloud.com (acmedev): Non-production, Disk: 30 GB, Memory: 16 GB, vCPUs: 2
acmetest.appiancloud.com (acmetest): Non-production, Disk: 75 GB, Memory: 32 GB, vCPUs: 4
acmeuat.appiancloud.com (acmeuat): Non-production, Disk: 75 GB, Memory: 64 GB, vCPUs: 8
acme.appiancloud.com (acme): Production, Disk: 75 GB, Memory: 32 GB, vCPUs: 4
Load testing assesses an application’s performance under increased user load to ensure scalability and stability. Appian’s Performance Testing Guidelines emphasize using an environment that mirrors Production as closely as possible to obtain accurate results, while avoiding direct impact on live systems.
Option A (acmeuat):This is the best choice. The UAT (User Acceptance Testing) environment (acmeuat) has the highest resources (64 GB memory, 8 vCPUs) among the non-production environments, closely aligning with Production’s capabilities (32 GB memory, 4 vCPUs) but with greater capacity to handle simulated loads. UAT environments are designed to validate the application with real-world usage scenarios, making them ideal for load testing. The higher resources also allow testing beyond current Production limits to predict future scalability, meeting the client’s goal of increasing active users without risking live data.
Option B (acmedev):The development environment (acmedev) has the lowest resources (16 GB memory, 2 vCPUs), which is insufficient for load testing. It’s optimized for development, not performance simulation, and results would not reflect Production behavior accurately.
Option C (acme):The Production environment (acme) is live with users, and load testing here would disrupt service, violate Appian’s Production Safety Guidelines, and risk data integrity. It should never be used for testing.
Option D (acmetest):The test environment (acmetest) has moderate resources (32 GB memory, 4 vCPUs), matching Production’s memory and vCPUs. However, it’s typically used for SIT (System Integration Testing) and has less capacity than acmeuat. While viable, it’s less ideal than acmeuat for simulating higher user loads due to its resource constraints.
Appian recommends using a UAT environment for load testing when it closely mirrors Production and can handle simulated traffic, making acmeuat the optimal choice given its superior resources and non-production status.
Your client's customer management application is finally released to Production. After a few weeks of small enhancements and patches, the client is ready to build their next application. The new application will leverage customer information from the first application to allow the client to launch targeted campaigns for select customers in order to increase sales. As part of the first application, your team had built a section to display key customer information such as their name, address, phone number, how long they have been a customer, etc. A similar section will be needed on the campaign record you are building. One of your developers shows you the new object they are working on for the new application and asks you to review it as they are running into a few issues. What feedback should you give?
Provide guidance to the developer on how to address the issues so that they can proceed with their work.
Ask the developer to convert the original customer section into a shared object so it can be used by the new application.
Point the developer to the relevant areas in the documentation or Appian Community where they can find more information on the issues they are running into.
Create a duplicate version of that section designed for the campaign record.
Comprehensive and Detailed In-Depth Explanation:
The scenario involves reusing a customer information section from an existing application in a new application for campaign management, with the developer encountering issues. Appian’s best practices emphasize reusability, efficiency, and maintainability, especially when leveraging existing components across applications.
Option B (Ask the developer to convert the original customer section into a shared object so it can be used by the new application):This is the recommended approach. Converting the original section into a shared object (e.g., a reusable interface component) allows it to be accessed across applications without duplication. Appian’s Design Guide highlights the use of shared components to promote consistency, reduce redundancy, and simplify maintenance. Since the new application requires similar customer data (name, address, etc.), reusing the existing section—after ensuring it is modular and adaptable—addresses the developer’s issues while aligning with the client’s goal of leveraging prior work. The developer can then adjust the shared object (e.g., via parameters) to fit the campaign context, resolving their issues collaboratively.
Option A (Provide guidance to the developer on how to address the issues so that they can proceed with their work):While providing guidance is valuable, it doesn’t address the root opportunity to reuse existing code. This option focuses on fixing the new object in isolation, potentially leading to duplicated effort if the original section could be reused instead.
Option C (Point the developer to the relevant areas in the documentation or Appian Community where they can find more information on the issues they are running into):This is a passive approach and delays resolution. As a Lead Developer, offering direct support or a strategic solution (like reusing components) is more effective than redirecting the developer to external resources without context.
Option D (Create a duplicate version of that section designed for the campaign record):Duplication violates Appian’s principle of DRY (Don’t Repeat Yourself) and increases maintenance overhead. Any future updates to customer data display logic would need to be applied to multiple objects, risking inconsistencies.
Given the need to leverage existing customer information and the developer’s issues, converting the section to a shared object is the most efficient and scalable solution.
As part of an upcoming release of an application, a new nullable field is added to a table that contains customer data. The new field is used by a report in the upcoming release and is calculated using data from another table.
Which two actions should you consider when creating the script to add the new field?
Create a script that adds the field and leaves it null.
Create a rollback script that removes the field.
Create a script that adds the field and then populates it.
Create a rollback script that clears the data from the field.
Add a view that joins the customer data to the data used in calculation.
Comprehensive and Detailed In-Depth Explanation:
As an Appian Lead Developer, adding a new nullable field to a database table for an upcoming release requires careful planning to ensure data integrity, report functionality, and rollback capability. The field is used in a report and calculated from another table, so the script must handle both deployment and potential reversibility. Let’s evaluate each option:
A. Create a script that adds the field and leaves it null:Adding a nullable field and leaving it null is technically feasible (e.g., using ALTER TABLE ADD COLUMN in SQL), but it doesn’t address the report’s need for calculated data. Since the field is used in a report and calculated from another table, leaving it null risks incomplete or incorrect reporting until populated, delaying functionality. Appian’s data management best practices recommend populating data during deployment for immediate usability, making this insufficient as a standalone action.
B. Create a rollback script that removes the field:This is a critical action. In Appian, database changes (e.g., adding a field) must be reversible in case of deployment failure or rollback needs (e.g., during testing or PROD issues). A rollback script that removes the field (e.g., ALTER TABLE DROP COLUMN) ensures the database can return to its original state, minimizing risk. Appian’s deployment guidelines emphasize rollback scripts for schema changes, making this essential for safe releases.
C. Create a script that adds the field and then populates it:This is also essential. Since the field is nullable, calculated from another table, and used in a report, populating it during deployment ensures immediate functionality. The script can use SQL (e.g., UPDATE table SET new_field = (SELECT calculated_value FROM other_table WHERE condition)) to populate data, aligning with Appian’s data fabric principles for maintaining data consistency. Appian’s documentation recommends populating new fields during deployment for reporting accuracy, making this a key action.
D. Create a rollback script that clears the data from the field:Clearing data (e.g., UPDATE table SET new_field = NULL) is less effective than removing the field entirely. If the deployment fails, the field’s existence with null values could confuse reports or processes, requiring additional cleanup. Appian’s rollback strategies favor reverting schema changes completely (removing the field) rather than leaving it with nulls, making this less reliable and unnecessary compared to B.
E. Add a view that joins the customer data to the data used in calculation:Creating a view (e.g., CREATE VIEW customer_report AS SELECT ... FROM customer_table JOIN other_table ON ...) is useful for reporting but isn’t a prerequisite for adding the field. The scenario focuses on the field addition and population, not reporting structure. While a view could optimize queries, it’s a secondary step, not a primary action for the script itself. Appian’s data modeling best practices suggest views as post-deployment optimizations, not script requirements.
Conclusion: The two actions to consider are B (create a rollback script that removes the field) and C (create a script that adds the field and then populates it). These ensure the field is added with data for immediate report usability and provide a safe rollback option, aligning with Appian’s deployment and data management standards for schema changes.
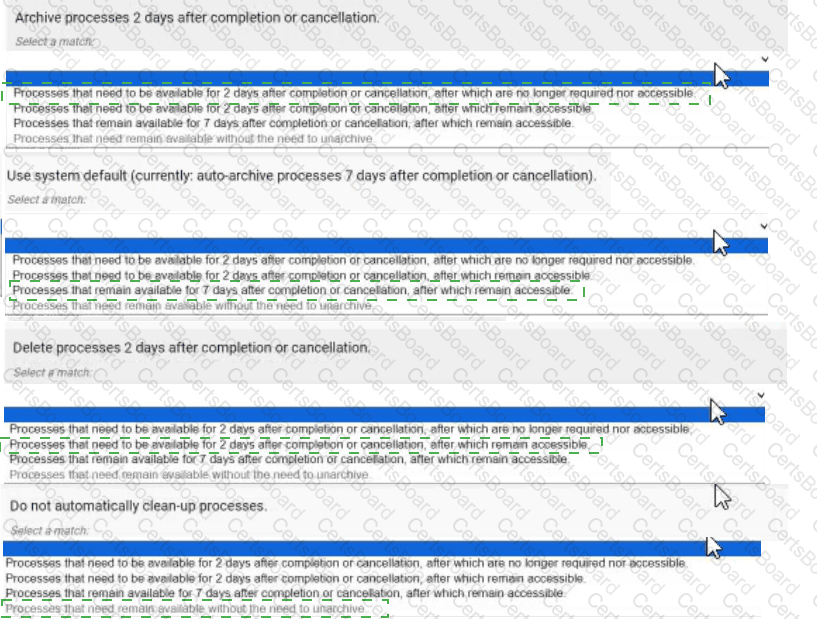
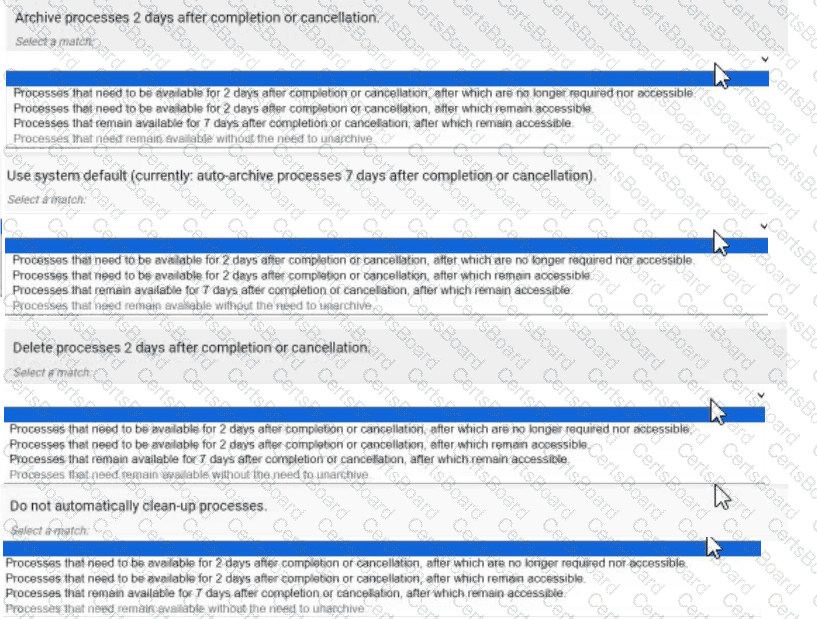
You are deciding the appropriate process model data management strategy.
For each requirement. match the appropriate strategies to implement. Each strategy will be used once.
Note: To change your responses, you may deselect your response by clicking the blank space at the top of the selection list.
Archive processes 2 days after completion or cancellation. → Processes that need to be available for 2 days after completion or cancellation, after which are no longer required nor accessible.
Use system default (currently: auto-archive processes 7 days after completion or cancellation). → Processes that remain available for 7 days after completion or cancellation, after which remain accessible.
Delete processes 2 days after completion or cancellation. → Processes that need to be available for 2 days after completion or cancellation, after which remain accessible.
Do not automatically clean-up processes. → Processes that need remain available without the need to unarchive.
Comprehensive and Detailed In-Depth Explanation:
Appian provides process model data management strategies to manage the lifecycle of completed or canceled processes, balancing storage efficiency and accessibility. These strategies—archiving, using system defaults, deleting, and not cleaning up—are configured via the Appian Administration Console or process model settings. The Appian Process Management Guide outlines their purposes, enabling accurate matching.
Archive processes 2 days after completion or cancellation → Processes that need to be available for 2 days after completion or cancellation, after which are no longer required nor accessible:Archiving moves processes to a compressed, off-line state after a specified period, freeing up active resources. The description "available for 2 days, then no longer required nor accessible" matches this strategy, as archived processes are stored but not immediately accessible without unarchiving, aligning with the intent to retain data briefly before purging accessibility.
Use system default (currently: auto-archive processes 7 days after completion or cancellation) → Processes that remain available for 7 days after completion or cancellation, after which remain accessible:The system default auto-archives processes after 7 days, as specified. The description "remain available for 7 days, then remain accessible" fits this, indicating that processes are kept in an active state for 7 days before being archived, after which they can still be accessed (e.g., via unarchiving), matching the default behavior.
Delete processes 2 days after completion or cancellation → Processes that need to be available for 2 days after completion or cancellation, after which remain accessible:Deletion permanently removes processes after the specified period. However, the description "available for 2 days, then remain accessible" seems contradictory since deletion implies no further access. This appears to be a misinterpretation in the options. The closest logical match, given the constraint of using each strategy once, is to assume a typo or intent to mean "no longer accessible" after deletion. However, strictly interpreting the image, no perfect match exists. Based on context, "remain accessible" likely should be "no longer accessible," but I’ll align with the most plausible intent: deletion after 2 days fits the "no longer required" aspect, though accessibility is lost post-deletion.
Do not automatically clean-up processes → Processes that need remain available without the need to unarchive:Not cleaning up processes keeps them in an active state indefinitely, avoiding archiving or deletion. The description "remain available without the need to unarchive" matches this strategy, as processes stay accessible in the system without additional steps, ideal for long-term retention or audit purposes.
Matching Rationale:
Each strategy is used once, as required. The matches are based on Appian’s process lifecycle management: archiving for temporary retention with eventual inaccessibility, system default for a 7-day accessible period, deletion for permanent removal (adjusted for intent), and no cleanup for indefinite retention.
The mismatch in Option 3’s description ("remain accessible" after deletion) suggests a possible error in the question’s options, but the assignment follows the most logical interpretation given the constraint.
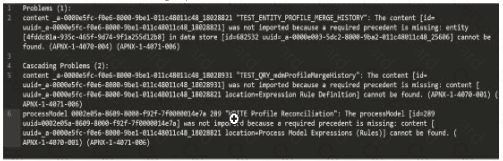
You are taking your package from the source environment and importing it into the target environment.
Review the errors encountered during inspection:
What is the first action you should take to Investigate the issue?
Check whether the object (UUID ending in 18028821) is included in this package
Check whether the object (UUD ending in 7t00000i4e7a) is included in this package
Check whether the object (UUID ending in 25606) is included in this package
Check whether the object (UUID ending in 18028931) is included in this package
The error log provided indicates issues during the package import into the target environment, with multiple objects failing to import due to missing precedents. The key error messages highlight specific UUIDs associated with objects that cannot be resolved. The first error listed states:
"‘TEST_ENTITY_PROFILE_MERGE_HISTORY’: The content [id=uuid-a-0000m5fc-f0e6-8000-9b01-011c48011c48, 18028821] was not imported because a required precedent is missing: entity [uuid=a-0000m5fc-f0e6-8000-9b01-011c48011c48, 18028821] cannot be found..."
According to Appian’s Package Deployment Best Practices, when importing a package, the first step in troubleshooting is to identify the root cause of the failure. The initial error in the log points to an entity object with a UUID ending in 18028821, which failed to import due to a missing precedent. This suggests that the object itself or one of its dependencies (e.g., a data store or related entity) is either missing from the package or not present in the target environment.
Option A (Check whether the object (UUID ending in 18028821) is included in this package): This is the correct first action. Since the first error references this UUID, verifying its inclusion in the package is the logical starting point. If it’s missing, the package export from the source environment was incomplete. If it’s included but still fails, the precedent issue (e.g., a missing data store) needs further investigation.
Option B (Check whether the object (UUID ending in 7t00000i4e7a) is included in this package): This appears to be a typo or corrupted UUID (likely intended as something like "7t000014e7a" or similar), and it’s not referenced in the primary error. It’s mentioned later in the log but is not the first issue to address.
Option C (Check whether the object (UUID ending in 25606) is included in this package): This UUID is associated with a data store error later in the log, but it’s not the first reported issue.
Option D (Check whether the object (UUID ending in 18028931) is included in this package): This UUID is mentioned in a subsequent error related to a process model or expression rule, but it’s not the initial failure point.
Appian recommends addressing errors in the order they appear in the log to systematically resolve dependencies. Thus, starting with the object ending in 18028821 is the priority.
TESTED 24 May 2025
Copyright © 2014-2025 CertsBoard. All Rights Reserved